Bring Peanut Butter Balls with Chocolate Rice Krispies to your table with an easy method and crowd-pleasing taste. It’s perfect for busy weeknights and casual gatherings alike.
Peanut Butter Balls with Chocolate Rice Krispies captures the essence of healthy & special diet|vegan while staying approachable for everyday cooking. The method focuses on maximizing flavor with minimal steps, using common pantry items and fresh ingredients. From the first bite you’ll notice a balance of texture and taste that feels both familiar and exciting. To build depth, we combine proper seasoning with simple techniques: gentle heat for aromatics, accurate measurements, and attention to doneness. Small details—like resting time or layering ingredients—make a noticeable difference in the final dish. This recipe is designed to be flexible. You can swap in seasonal produce, adjust spices to match your preferences, or adapt the base to suit dietary needs. The goal is to keep the spirit of the dish while letting you tailor it to your kitchen. Serving ideas are wide open: pair with a crisp salad, roasted vegetables, warm bread, or your favorite grains. Leftovers store well and often taste even better the next day as flavors settle. That makes the recipe suitable for meal prep and busy schedules. For best results, read the steps once before you start, assemble ingredients, and cook with confidence. Taste as you go, and don’t be afraid to adjust seasoning. With these principles, Peanut Butter Balls with Chocolate Rice Krispies becomes a reliable addition to your rotation—crowd-pleasing, practical, and full of flavor.
INGREDIENTS
1 cup of crunchy peanut butter (the chunkier, the better!)
6 tablespoons of honey (for that extra touch of sweetness)
1/8 teaspoon of salt (just a pinch to enhance the flavors)
3 cups of Rice Krispies cereal (the classic crispy goodness)
1 1/2 cups of vegan chocolate chips (because who doesn’t love chocolate?)
How To Make Peanut Butter Balls with Chocolate Rice Krispies
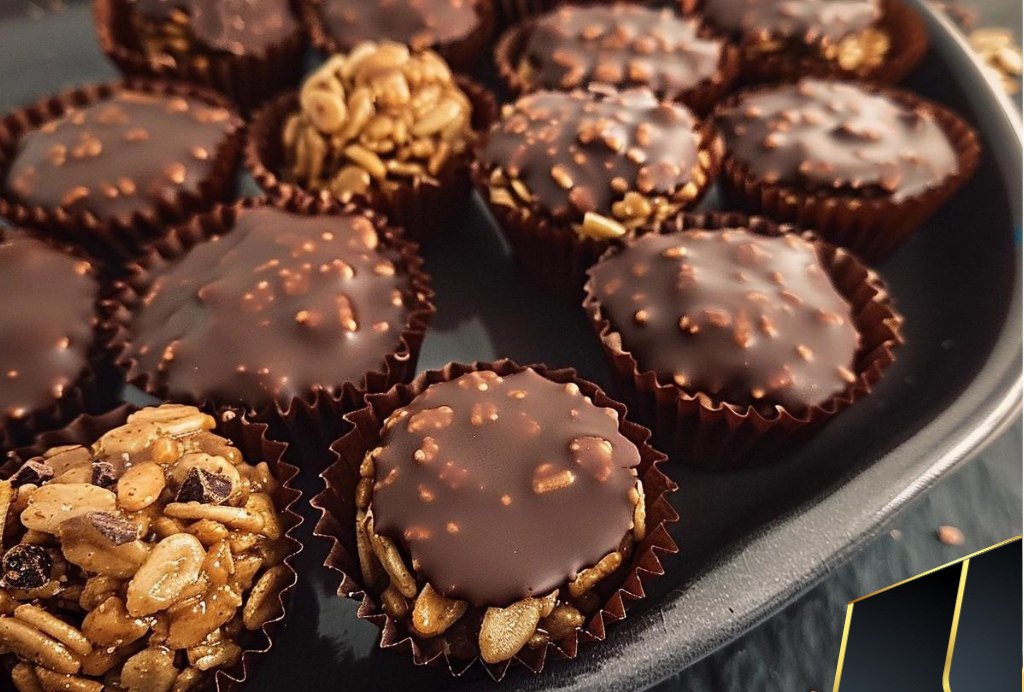
Grab a muffin pan and line it with liners. Give them a light spray of non-stick spray to make sure your treats come out easily.
Time to melt some goodness! In a saucepan over low heat, melt together the peanut butter, honey, and salt. Keep stirring until everything is melted and well combined. You’ll start to smell the delicious aroma!
Once the mixture is smooth and melted, take it off the heat. Now it’s time to add the Rice Krispies cereal. Stir it in until all the cereal is coated and mixed well. You want every bite to be packed with that peanut butter flavor.
Get your muffin pan ready and evenly distribute the mixture into the liners. Press it down firmly to make sure everything sticks together nicely. You don’t want any crumbly treats!
Now for the chocolaty goodness. In another saucepan over low heat, melt those vegan chocolate chips. Keep stirring constantly until they’re perfectly melted and smooth. Be careful not to burn it!
Spoon the melted chocolate over each treat in the muffin pan, making sure to distribute it smoothly and evenly. Get creative and make some swirls or patterns if you’re feeling fancy.
It’s time to chill out! Pop the muffin pan in the refrigerator and let the treats firm up. It won’t take too long, just enough time to build up your excitement.
Once they’re firm and ready to go, take them out of the fridge. Peel off the liners and get ready to indulge in these irresistible Peanut Butter Rice Krispies Treats. Share them with friends or keep them all to yourself – no judgment here!
So, go ahead and treat yourself to these delectable goodies. They’re the perfect combination of sweet, crunchy, and chocolaty goodness that will satisfy your cravings in no time. Enjoy every bite and savor the deliciousness!
PREPARATION STEPS
How To Make Peanut Butter Balls with Chocolate Rice Krispies
Time to melt some goodness! In a saucepan over low heat, melt together the peanut butter, honey, and salt
Keep stirring until everything is melted and well combined
You’ll start to smell the delicious aroma!
Once the mixture is smooth and melted, take it off the heat
Now it’s time to add the Rice Krispies cereal
Stir it in until all the cereal is coated and mixed well
You want every bite to be packed with that peanut butter flavor.
Get your muffin pan ready and evenly distribute the mixture into the liners. Press it down firmly to make sure everything sticks together nicely. You don’t want any crumbly treats!
Now for the chocolaty goodness
In another saucepan over low heat, melt those vegan chocolate chips
Keep stirring constantly until they’re perfectly melted and smooth
Be careful not to burn it!
Spoon the melted chocolate over each treat in the muffin pan, making sure to distribute it smoothly and evenly
Get creative and make some swirls or patterns if you’re feeling fancy.
It’s time to chill out! Pop the muffin pan in the refrigerator and let the treats firm up. It won’t take too long, just enough time to build up your excitement.
Once they’re firm and ready to go, take them out of the fridge
Peel off the liners and get ready to indulge in these irresistible Peanut Butter Rice Krispies Treats
Share them with friends or keep them all to yourself – no judgment here!
So, go ahead and treat yourself to these delectable goodies
They’re the perfect combination of sweet, crunchy, and chocolaty goodness that will satisfy your cravings in no time
Enjoy every bite and savor the deliciousness!
ORIGIN STORY
Home-style cooking inspired by classic flavors and modern, reliable methods.
META INFOS
Prep: 15 min | Cook: 20 min | Total: 35 min | Servings: 4 | Calories: ~300 kcal | Difficulty: Easy
BENEFITS
Balanced flavor with approachable prep. Nutrition-friendly options and make-ahead friendly for busy schedules.
OCCASIONS
Weeknight dinners; Family gatherings; Potlucks; Holidays; Picnics; Meal prep
VARIATIONS
Swap seasonal produce; Adjust spices; Offer gluten-free or low-carb options where suitable; Try alternative proteins.
PAIRING
Green salad; Roasted vegetables; Rice or bread
STORAGE
Refrigerate in airtight container 2–4 days; freeze up to 2 months. Reheat gently to preserve texture.
TIPS
Measure accurately; Preheat pans/oven; Avoid overcooking; Taste and adjust seasoning; Rest before slicing when needed.